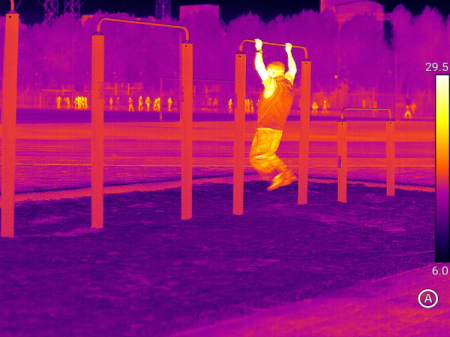
You've probably heard of "thermal imaging". The technology often appears in photos or films that look so surreal and cyberpunk. As thermal imaging is kind of a niche technology, few people know how it exactly works. In fact, thermal imaging is not too hard to understand. After reading this comics, you will know the working principle of thermal imaging.

In simple terms, infrared thermal imaging technology converts the infrared radiation emitted by objects into visual infrared thermal images and temperature data. But how to image? At the very beginning, let's understand two basic concepts.
No.1 Infrared Radiation
Everything in nature with a temperature above absolute zero (-273.15°C) constantly emits infrared radiation. The physical essence of infrared radiation is thermal radiation, a form of electromagnetic wave. It comes from the thermal motion of molecules within matter.

No.2 Infrared Window
The infrared spectrum ranges from 0.78 µm to 1000 µm. However, due to the atmosphere's strong absorption of infrared radiation—primarily by water vapor—gaps between these absorption bands are known as infrared windows. In other words, only infrared radiation within the following three wavelength ranges can pass through the atmosphere, forming the foundation for thermal imaging.
")
How Thermal Imaging works?
Thermal camera is a vehicle of infrared thermal imaging technology. The basic principle of the technology involves converting infrared radiation into heat, which is then transformed into electrical signals through sensitive materials. To provide a clearer understanding, this conversion process can be broken down into four detailed steps.

Step1: Get Infrared Radiation
Infrared radiation energy from various target scenes (including temperature or radiation differences between the target and background or among different parts of the target) is collected and converged by specialized infrared optical lenses, then focused onto an infrared detector.

Step2: Signal Conversion
The infrared radiation emitted by the target is absorbed by the infrared detector, where it is converted into heat. This heat causes a temperature rise in the thermally sensitive resistor region within the detector, leading to a corresponding change in resistance. By applying a bias current, this resistance change induces a voltage change, enabling signal conversion.

Step3: Signal Processing
The signal processing circuit amplifies, processes, and transmits the electrical signals converted by the infrared detector through multiple channels. This process includes biasing, sampling and readout, linear transformation, A/D conversion, and integration control, enhancing the signal’s intensity and clarity.

Step4: Thermal Imaging
The processed signal is sent to a display unit, outputting either digital signals or visual imaging as required. The signal undergoes non-uniformity correction, automatic gain and brightness control, grayscale adjustment, and pseudo-color rendering. Ultimately, this generates an infrared thermal image that corresponds to the target object's surface heat distribution.
")
It is important to emphasize that beyond its literal imaging capabilities, infrared thermal imaging can enable panoramic temperature measurement through thermal image analysis combined with temperature measurement algorithms. This allows for remote, non-contact, wide-area, and rapid-response temperature monitoring.
")
That being said, such a rich and detailed infrared image, presented through such advanced technology, surely isn’t just for show. So, what exactly is infrared thermal imaging used for? Well, hold your horses – we'll dive into that in the next issue!